Betsey Johnson Giveaway


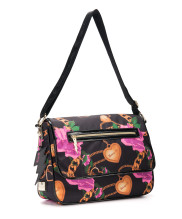
I love designer Betsey Johnson, so I thought it appropriate I pick one of her bags to give away for our contest this month. Her style is fun, edgy, but still feminine....kind of like our site!


Head over to www.craftgossip.com and leave a comment about one of our projects and you will be entered to win the purse valued at $98.00. Contest ends December 1st. 

Laura's Flying Bat Card


Happy Halloween Rebel Crafters! It's not too late to make an adorable card to give to a friend, neighbor, or your child's teacher. My friend and handmade card maker Laura Sampson made this eye catching Flying Bat Card. Love it. Here are her instructions so you can make it today:


Materials:


Card base. Purple, black, or dark grey works well

Holographic and  silver embossing powder


Versamark embossing ink

Bat diecut from blackcardstock I used one precut from Martha Stewart, but it would be easy to cut one yourself or use your own die.


2 tiny gems for the bats eyes


Large swirl stamp for background, any kind of spiral, flourish, or even stars would work.


Circle diecut from gray cardstock I used 2.5 inch
 or smaller 1.5"

To Make:


Stamp the background flourish design on the card with Versamark, sprinkle on the holographic powder, and heat to emboss.

For the moon, cover the whole surface of the circle diecut with Versamark by pressing onto the stamp pad. Lay flat and apply silver embossing powder. Using a stiff brush and pounce the powder to break up , you dont want an even coating. This gives the moon some texture. Heat to emboss.


Apply the gem eyes to the bat.  


Attach moon to card with tape. 


Attach bat with dimensional foam dots. 


Stamp sentiment inside if desired....DONE!


Happy Halloween!
Hope you get lots of treats!

XOX,

The Rebel Crafter

60 Second Earrings


Since we are a new crafting site I thought the first earrings I posted should be the easiest. These literally will take one minute to make. They are the perfect match to our Rockin' Hair Clips project. Make them using the same embellishments and you create a perfect gift set.

You will need:


6 mm Pierced Earring Posts (I bought my pack of 60 at Michaels for $2.99)
Earring backs
E6000 Glue
Embellishments: Refer to the project Rockin' Hair Clips  for ideas
Toothpicks


Place one drop of E6000 glue on the earring post. Use a toothpick to catch any extra glue off the sides.


Center the cabochon.

Place upright on cabochon or poke earring into a piece of styrofoam to hold in place while drying.


Allow to dry 24 hours.


Crystal Heart Earrings:


The hearts were found in the jewelry section at Michaels. They come on a strand.

Place drop of glue on earring post and center at the top of the heart on the flat angled part.


You can create an easy earring card by folding over a piece of scrapbooking paper and glue the flap down with tape runner. 


XOX,

The Rebel Crafter

Hanging Bat Card


Halloween is almost here! This is a fun and easy card made out of black cardstock paper. You can use wire or thin black ribbon for the legs, and buttons or google eyes for the eyes. Stamp your saying upside down inside the card for fun. Also consider attaching a small stick at the top of the card for the legs to hang onto.

You will need:


Black Cardstock Paper
Scrapbook paper for background and teeth
Buttons for eyes (or google eyes)
Blank card (I used 6.5" x5" card)
Wire or thin ribbon for the legs
Pop Dots and Tape runner


Cut a piece of black cardstock 6.25" x 4.75"


Cut Background cardstock 6" x 4.50"


Distress edges of background paper (optional). I used Cats Eye Charcoal.


Layer both papers and attach to blank card.


Attach wire (or ribbon) for the legs with small glue dots.


Cut out a piece of black cardstock 2.25' x 5".


Cut two small triangles for the bat wings. I embossed my wings with a swirl stamp (optional).


Cut a letter "M" onto the one end of the paper.


On the opposite side cut at an angle about 1" toward the middle, then across, then back up  toward the other corner so you have two points.


Cut a notch on each side of the bat body and slim the bat out.


Attach bat to the card with Pop dots so it is raised off of the card.

Attach buttons with small glue dots.

Cut out two little triangles for teeth.

Attach a small stick to the card (optional) for the feet to hang off of.

Stamp your message Upside Down on the inside of the card (optional).


XOX,

The Rebel Crafter

Vera Bradley Inspired Decoupage Pumpkins


Decoupage pumpkins are pretty prolific this year. Just about every craft magazine has a toile version. While I like black and white toile I wanted to approach it a little differently. What would stand out on a Thanksgiving centerpiece or buffet? That lead me to this project. I originally started with leopard print, which is fabulous on the pumpkins, and then continued on with Vera Bradley. I like the mix of the leopard print with the bold paisleys and florals. So how do you make these designer inspired pumpkins? Actually it is pretty easy and you may already have the main ingredient in your home...paper decorative hand towels. (you know the ones in your spare bathrooms). They are easy to find at any home goods type store and come in several fun patterns. These bold pumpkins would make a great gift to bring to Thanksgiving dinner. 

You will need:

Decorative Paper hand towels (I used Vera Bradley and leopard print ones)
Plastic Pumpkin
Mod Podge
Foam Brush or Paint Brush
Ribbon ands Charm (optional)
White Spray Paint (optional)
Plastic Gloves (optional)


Decide on a paper napkin design. Leopard print is very easy. The print is easily repeated. The bolder the pattern the easier to follow the repeat around the pumpkin. Tiny patterns are a little trickier, but they look very cute done patchwork style. If your paper has a lot of white on it you may want to spray paint your pumpkin white so no color bleeds through. I did not spray my pumpkins white, but I would consider it when I make them again. It would create the clearest image on the pumpkin. One of my pumpkins was already distressed white and I liked the results on that one very much.

Unfold the paper towel. You will see there is an extra white sheet behind the patterned paper. 

Unpeel the inner white sheet


Cut or tear the napkins in a few strips

Trim off any border detail on the napkin.


Apply Mod Podge with your brush to a section of the pumpkin the size of your paper 
strip.

Press your Paper down gently being careful not to tear it. Tap it gently. Using plastic gloves makes this easier.


Apply a light coat of Mod Podge over your strip.

Apply the next paper towel strip lining up the pattern as best as you can. (follow the order you tore the paper). It doesn't have to be perfect, but it looks more seamless this way.


Continue around the pumpkin. Let dry and do the bottom.

Once you are finished give your Pumpkin one or two coats overall of Mod Podge.


Once dry your pumpkin will look great! You can add embellishments like a ribbon and charm if desired. If you are like me, you will have to make a variety of sizes, and patterns, for a fabulous pumpkin display.


Enjoy,

XOX,

The Rebel Crafter

Uptown Witch Shoes Card


I want to first give a big thanks to our new members, and to those of you who have put my projects on Stumbleupon, Tumblr, and Pinterest. You really rock! We are a very new blog so it has been amazing to get your support. I appreciate you spreading the Craftingrebellion word!


OK so shoes for a Halloween card?... I have to confess I have a major thing for shoe cards, so I had to make a Halloween pair. The card is fun to make, and just like our Baby Booties Card the beauty is in the embellishment. Use bows, brads, or dimensional stickers for the shoe clips. The bat shoes are embellished with bats and a purse cut out from the Cricut cutter. If you would like to see any Cricut crafts on our site let me know by leaving a message in the comments section.

I am going to show you how to make the shoe card with the stamped spider web.


For this card project you will need:

Blank card
Halloween Themed Paper
Black and White card stock
Inkadinkado Clear Stamps "All Hallow's Eve"
Ribbon and Embellishments for Shoes


Start by cutting a piece of black card stock 1/4" smaller than your card. In my case my card is 6.5" x 5" so my black card stock is 6 1/4" x 4 3/4"

Cut a piece of white card stock 1/4' smaller than the black.

Stamp a Spider web and spider in the upper corner (left or right). Stamp a Happy Halloween saying in the lower right corner. 


Attach your white card stock to the black card stock and tape runner onto your card.

Cut out two pieces of Halloween themed paper for your shoe 1 1/2" x 4 1/2"

Cut two pieces of black card stock the same size.


Layer your two Halloween papers together and trim one end to a point. 

Next round out the opposite side. 

Curve the sides inward. Trim until you like the way your shoe looks. 

Place one of the halloween papers on top of the two black pieces and cut them the same size. 

Take your black pieces and cut the sides and back about 1/8" smaller. 

When you get to the top edge of the point curve upward cutting off the triangle point. See photo below. You can also curve in the opposite direction.


Attach your insoles to your shoes with tape runner. 

Attach your shoes to your card with tape runner. You can attach them flat, or use two pop dots on the heel and so it make the heels raised up. I did this on the skeleton shoes. 

Cut two pieces of ribbon approximately 3" long. Put tape runner or glue dots on the reverse side and fold the ribbon ends together to create a bow. Attach a smaller ribbon around the bow with tape runner. 


Attach your bows to the shoes with a glue dot. Or use a brad or dimensional sticker instead of a bow. 

Cut out two small narrow strips of the Halloween paper and attach as shoe straps. (optional)

Send your cute Halloween shoes to a stylish friend!


XOX, 

The Rebel Crafter

Rock Your iPhone


I knew I wanted to make my own bling iphone case about a month ago. I was reading my favorite blogger Gala Darling's diary about her adventures in Chicago and in one of the photos she is holding up this fabulous gem encrusted iphone cover she bought. It is sparkly pink, hearts, and pearls, and oooh I wanted it. (I have a thing for pink sparkly stuff, maybe I am still just a teen girl at heart). But instead of caving and searching all over for one to buy, I decided I would make my own version. I wanted to see just how hard they were to make, because I could see that they would make outstanding gifts.

This is not a typical Rebel Crafter project as this project takes a few hours to create. I still give it a big thumbs up for the time invested because when you are done you get to hold that little work of art in your hand all the time.

For supplies the blank iphone cases are sold at dollar stores. I went to my dollar store but they were sold out. They said they get them in periodically and to check back. I ended up buying my cases on Etsy for $7, so try the dollar store first. The cabochon trinkets can be found at the craft stores or on Etsy under cabochon in the "supplies" section. You can be creative and recycle stuff too. Many of my trinkets are scrapbooking stickers that I peeled the adhesive off the back before gluing down. Also, consider Gumball machine trinkets, charms for necklaces, earrings, and buttons with the shanks removed. Or skip trinkets and do an all over gem look. The flat back gems are pretty inexpensive. I bought most at Michael's where they have an area devoted to flat back gems and each container is about $2.99. I also bought a little bag of flat back pearls on Etsy. 


This project ranks pretty easy (just takes time). You need:

Plain Hard Plastic iPhone cover (soft flexible does not work well) (check Ebay, dollar stores, and Etsy)


E-6000 Glue


Toothpicks


Gem Pick Up Tool Like "Quick Stick" or a Wax Pencil


Flat Back Gems in a couple sizes and colors (you do not want adhesive gems, do not buy the sticky kind) (Check on Ebay, Etsy, also sold at Michael's and other craft stores)


Flat Back Pearls (optional) (Find on Ebay, or Etsy, sometimes sold in craft stores like Michaels but often as stickers. If they are stickers you wil need to remove the adhesive backs)


Cabochon trinkets, refer to our Rockin' Hair Pins for ideas Ideas include dimensional stickers, large plastic gems found in kids crafting area, earring and necklace findings, and charms. If you always use your phone in your pocket stick with smooth gems like the pink case. Pronged gems may catch on your material.


Start by laying out your large trinket pieces on your iphone case until you like the placement. 
Glue those down with E-6000. If the trinket is an adhesive plastic sticker make sure you peel off all of the adhesive back before gluing down as adhesive stickers would never hold up to the iphone use. 


Next start filling in your gem background

Take some E-6000 on a toothpick and spread out about 1/2-1 inch area. Do not spread more than 1 inch as the glue dries too quickly. 


Use your gem pick up tool or wax pencil to pick up a gem and start placing them. I like to spread out a variety of the gems on my work surface so I can pick up random sizes. Like a puzzle you will have to think about what size works best along corners etc. Decide if you want a pattern (like the border of the pink phone case), or random. I think in some ways the pattern is easier than random.


As you fill in an area stop and take a look to make sure you like everything before moving on.


Continue until your entire front is covered.


Let the cover dry for the evening, or at least an hour or so before continuing down the sides.


Lay out a few gems on the side to find the best placement for the narrow width before gluing down. Again this project is like a small cross stitch, it takes some time, but when you place that last gem on celebrate...you just rocked your iphone!


Let your cover dry for 24-48 hours before using or giving.

Now is the perfect time to start making these little gems for Girlfriends, Sisters, Daughters, and Grand Daughter's. I think any girl would love one of these cases to rock their phone. I sure love mine!


XOX,

The Rebel Crafter

My Husband's before and after Nerium photo at 6 days. Click on the photo if you want to check out my Nerium page. It is a great product with a money back guarantee. Use it for the month and return it on day 29 if you don't love it. But if you are like all my friends you will love it!


Amazing (Gluten Free, Dairy Free, and Egg Free) Apple Cake


Ok I know, I know, this is a crafting site, not a food site, and desserts in jars are not that unique...but a really good dessert free of gluten, dairy, and egg is well, rebellious! Something moist, and rich, and comforting does not usually equal gluten free and vegan, but this cake does. I had to share this recipe I created because it really is that yummy. Those without food allergies will love it equally.

Last weekend we had our first snowfall here in Denver and it felt like baking weather. But what to bake? I am allergic to the big 3 (wheat, dairy, and egg) so I have to get VERY creative with my baking. The idea for this recipe comes from my Grandmother Rosella's apple cake. I had to remake the recipe but I think she is smiling down on me for sharing the cake she loved in a new way.

Here is the recipe, Enjoy!

Batter:

1 box Betty Crocker Gluten Free Yellow Cake Mix
1/2 box Jello Brand Instant Butterscotch Pudding (sugar free or regular)
1/2 cup melted Coconut Oil (I used LouAna brand found at the grocery store). Put in the microwave for about 30 seconds to melt.
*EnerG Egg Replacer (follow the package instructions for 3 eggs=4 1/2 tsp mix with 6 tblsp water)
3/4 cup Water
1 Teaspoon vanilla
2 Teaspoons  Cinnamon
6 Granny Smith Apples peeled and chopped into chunks (reserve 1/2 apples for topping)

*for those preferring to use eggs, use 3 eggs and 2/3 C water, instead of egg replacer and 3/4 C Water)

Topping:

1/3 cup Brown Sugar
1/2 Chopped Apples
3 Tablespoons melted Coconut Oil
1 1/2 Teaspoon Cinnamon

5 pint Sized Bell jars (or you can make more servings using smaller sized 1/2 pint jars)

Grease your bell jars with the coconut oil.

Mix the Batter ingredients and 2/3 of the chopped apples together until blended. If your batter is a little thick just add a little more water and oil.

In a separate bowl combine the remaining 1/3 apples and the topping ingredients.

Add one large spoonful of topping to the bottom of the jar. Add batter until the jar is a little over 1/3 full. Add another spoonful of topping on top. Do not fill your jar more than 1/2 full or it may overflow during baking.

Layer one spoonful of apple topping, batter, one spoonful of topping

Smells as good as it looks!


Place your jars on a cooking tray and Bake 350 degrees for 35 minutes, or until your toothpick comes out clean from the batter.

Wonderful on its own or with a scoop of vanilla non dairy ice cream on top. Enjoy!


XOX,

The Rebel Crafter

Welcome

Welcome
Lovers of crafting you have found a new home

Total Pageviews

Popular Posts

Use Coupon Code CRAFTINGTHANKS for 20% Off

SEARCH

SOCIAL


Template design by Vampire Craftin. Photoshop sparkles and Ad buttons by Plumroselane. Powered by Blogger.